

Do-It-Yourself Mask
What do > Association Religious Clerical > Works of Apostolate > Do-It-Yourself Mask
Do-It-Yourself Mask
an economic way to achieve it
.
PRESENTATION
Premise
The Statute of the Family Missionary Saint Nicodemus - Association Clerical, provides that among its works of apostolate there is also that of justice and peace, and in this regard, it reports the following.
Wanting to pursue the inculturation of the gospel values of justice and peace, the Association aims to promote solidarity between the subjects of society, as well as the family, also through the implementation of welfare projects for the neediest.
The Association also wants to promote peaceful social coexistence, also through initiatives that can promote dialogue, respect for the dignity and freedom of conscience of every man, and education in morality and legality.
Working for such social well-being, in addition to being a requirement of evangelical charity, is configured as an invitation to conversion, therefore as a way of preparation for the knowledge and love of the absolute truth which is Christ (cf. Jn 3:21).
In this spirit, the Family Missionary Saint Nicodemus - Association Clerical, has decided to propose its own do-it-yourself mask packaging method, believing that it can be useful especially where there is poverty of means and difficulties in the movement of goods.
.
.
Information for Consultation
The article on do-it-yoursel mask packaging is presented on the site divided into fourteen pages.
The table below will be reproduced at the beginning of each page, with the titles of all fourteen pages.
Each of them can be accessed by clicking on the respective title indicated in the table.
The table also highlights four flags, which indicate the four languages in which the article can be read: Italian, French, Spanish and English.
By clicking on one of the reference flags, you can access the article presentation page in the desired language.
.
.
Full Text
The complete text relating to the creation of the mask is shown below, while on the following pages the same text is divided in relation to the different operating phases, which are illustrated with photos.
Do-It-Yourself Mask
An economic way to achieve it
INTRODUCTION
I am the priest Tommaso Boca, currently residing in Italy, responsible for the Family Missionary Saint Nicodemus - Association Clerical, which is based in Tshikapa, in the Democratic Republic of the Congo.
Urged by the emergency caused by the Covid-19 virus, I also decided to propose a do-it-yourself mask packaging method: it can be made with accessible equipment and materials, both with regard to their cost and their retrieval.
In the realization of the mask I had the collaboration of my religious brother Vincenzo Versaci, whom I thank.
Hoping that the emergency, due to the free commitment of many, will blossom in the improvement of the conditions of man in his universality and in his entirety, I wish everyone to live in love and to seek the strength to do it.
. CLARIFICATIONS
It should be noted that the do-it-yourself mask does not guarantee the hermetic characteristic, which prevents the passage of the tiny droplets of a few microns expelled when speaking, coughing or sneezing; however, it can be useful in order not to disperse the vast majority of the most macroscopic droplets.
Therefore, it is not enough to prevent you from infecting someone in case you are sick, but it decreases the possibility. The mask does not even prevent one's infection: however, wearing it is the prerequisite for the other to do it too, and therefore I enjoy the benefit just said.
Remember that a mask is reusable if it can be washed at 60 degrees: in this respect, the strings of this mask are reusable when they are subjected to the required wash.
.
.
.
A. CONSUMABLES
1. Tears of paper dry everything, for the structure, in number of two and superimposed.
2. Plastic strip, made from a biodegradable plastic bag, for the screen.
It must have a surface such as to contain a rectangular square of 21 x 24 cm.
3. Sheet of paper.
It is used for finishing the strip; it comes from the recycling of an old magazine.
It must have the shape of a rectangle of about 28 x 25 cm; and must have straight at least one of the two longest edges.
4. Paper table napkin, for the pillow, folded in four layers.
5. Strips of cotton fabric, for the strings, in number of two.
They were obtained from the recycling of an old disused shirt. Each of them is 50 cm long and 1 cm high; in order to facilitate the packaging of the mask, the strings they were rubbed on a piece of slightly moistened soap, tapered and left to dry for a few hours.
6. Soap, a pinch.
It served for the finishing of the strings.
.
.
.
B. EQUIPMENT
1. Scissors to cut the paper.
2. Paper plier punch.
Failing that, it can be replaced by an iron tool with a sharp point.
3. Forms of work, on cardboard, in number of three.
A form is used to square and punch the paper dry everything, used for the structure of the template. A second to square and punch the plastic strip, used for the screen of the mask. The third to square and punch the napkin, used for the pillow of the mask.
4. Master Forms, on cardboard, in number of two.
They are used to create the forms of work and are used to make the mask; in fact, on the master forms, each hole is indicated with a letter, and in the procedure for assembling the mask, the sequence in which the holes must be crossed is indicated, for a correct stitching of the mask itself.
5. Row.
It served for the realization of the master forms and of the forms of work.
6. Pen.
It served for the realization of the master forms and of the forms of work.
Below is a detailed description of the procedure necessary for the creation of the master forms and of the forms of work.
.
.
.
C. WORKING TABLE
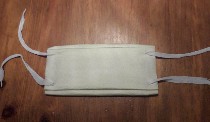
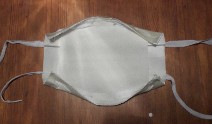
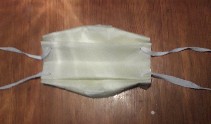
The mask we are dealing with consists of a support and a body, divided into three layers.
Outside there is a waterproof layer: the screen; in the centre the bearing one: the structure; inside the facial one: the pillow.
The support consists of two strings, which serve to fix the mask to the face but also to join the layers that make it up.
To make this mask, we prepared the tools and materials needed for its packaging on the work surface.
As equipment we have:
The scissor; the plier punch; three forms of work; two master forms.
The cap has been removed from the perforator, that is, the part that prevents the paper circles resulting from the puncture from falling: in this way, by perforating from bottom to top, the area in which you must work is visible.
As consumables we have:
Two overlapping tears of paper dry everything, for the structure; a plastic strip for the screen; a sheet of paper to support the realization of the screen; a paper napkin for the pillow; two strips of cotton fabric, treated with soap, for the strings.
.
.
.
D. SQUARING AND DRILLING OF THE "STRUCTURE"
a. Take the two overlapping tears of paper dry everything, fold them in two and insert them in the Structure Form, in correspondence with the central fold line indicated therein; making as few sides as possible protrude from the perimeter of the Form.
b. Then the protrusions are cut, then the holes are drilled on the paper dry everything, in correspondence with the holes that are on the Form.
c. At this point, the paper dry everything-structure is extracted from the inside of the Form, ready to be used in the assembly of the mask; and is placed on the work surface.
.
.
.
E. SQUARING AND DRILLING OF THE "SCREEN"
a. Take the plastic strip, fold it in two and insert the sheet of paper into the fold, making it move forward with the straight edge; everything fits into the Screen Form which is folded in two again.
b. Then you cut out, of the sheet of paper and of the strip, what comes out of the contours of the Form.
c. Then the holes are drilled, on the plastic strip and at the same time on the sheet of paper, in correspondence with the holes that are on the Form.
d. At this point, the strip-screen is extracted from the inside of the Form, ready to be used in the assembly of the mask; and is placed on the work surface.
.
.
.
F. SQUARING AND DRILLING OF THE "PILLOW"
a. Take the paper napkin, fold it in two and insert it in the Pillow Form in correspondence with the fold line indicated therein; making as few sides as possible protrude from the perimeter of the Form.
b. Then, if there are any, cut the protrusions, then drill the holes on the napkin in correspondence with the holes that are on the Form.
c. At this point, the paper napkin-pillow is extracted from the inside of the Form, ready to be used in the assembly of the mask; and is placed on the work surface.
.
.
.
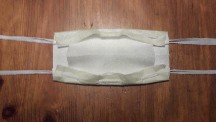
G.1- ASSEMBLY OF THE MASK - FIRST PHASE
a. The Pillow, the Structure and the Screen are arranged in an overlapping manner, in the order described.
The holes of the Screen and of the Structure are completely mating, while the holes of the Pillow, which are only eight, mate in those marked with the letters B2, A2, A1 and B1, as well as in those marked with the letters B3, A3, A4 and B4.
The assembly work is carried out by operating from the outside of the mask, and consists of a sort of seam: the needle is represented by the ends of the strings which previously, as we said, have been adequately treated.
b. Work begins on the upper central part of the mask by inserting the two ends of one of the strings in correspondence with the holes that are indicated on the Master Forms with the letters A1 and A2
c. The two ends of the string are inserted from top to bottom, bearing in mind that in the four central holes, below the Screen layer and the Structure layer, there is also the Pillow layer to be assembled.
d. The stitching is done as in hand stitching, and one proceeds with one of the ends, clockwise, from the hole A1 to the hole F1, and with the other end, anticlockwise, from the hole A2 to the hole F2.
e. In this way, the assembly of half of the mask is finished: it only needs an adjustment.
f. If the sewing work has been done correctly, the two ends are lying above the screen layer, after having come out of the holes F1 and F2, respectively.
g. These garments must be grasped and pulled both, in opposite directions, outwards, with a little energy but slowly.
h. This operation produces, on the mask being packaged, first a groove and then a folding of the angles inwards, until the join of holes C1 and C2, respectively, with the holes D1 and D2: for the identification of the holes, they can consult the Master Forms, in which the positions of the single holes indicated on the Forms of work are marked.
Regarding the effects that are created in pulling the strings, it is appropriate to accompany and help these effects with your hands, especially the folding of the corners inwards.
.
.
.
G.2- ASSEMBLY OF THE MASK - SECOND PHASE
i. At this point the package is rotated 180 degrees and the same sewing work done before is repeated, always keeping in mind that in the four central holes, under the Screen layer, in addition to the Structure layer, there is also the Pillow layer to be to assemble.
.
.
.
G.3- ASSEMBLY OF THE MASK - FINAL RESULTS
j. The Mask is ready to be worn.
.
.
.
H. CREATION OF THE RULER MULTIFUNCTIONAL
a. A particular row is created, with the intention of facilitating the identification of the points on the Master Forms, in view of their drilling: the multifunctional Ruler.
b. A cardboard of 13.5 cm of base for 2.5 cm of height is prepared: on the base four points are identified, in correspondence of which later holes will be drilled.
c. These points must be 1.5 cm away from the base and 1.5 cm, 5 cm, 7 cm and 9 cm away from the left side edge respectively.
d. Starting from the left side edge, we indicate with the words ALFA and BETA the starting and ending ends of the cardboard.
e. We rotate the cardboard 180 degrees and draw a vertical segment on it, distant from the left side edge 3 cm, and near this edge, to mark it as the initial end of the cardboard, considered in its behind, we write the word GAMMA.
f. The identified points are drilled: we have obtained a particular line: the multifunctional Ruler; we will use it for the creation of the Matrix for the "Structure" and the "Screen", and of the Matrix for the "Pillow".
.
.
.
I. CREATION OF THE MATRIX FOR THE "STRUCTURE" AND THE "SCREEN"
a. A 21 cm base cardboard-matrix for 24 cm height is prepared, which folds twice and is then reopened.
b. Operating on the top left corner of the cardboard-matrix, we must identify six points, at which holes will subsequently be drilled: four points must be 1.5 cm distant from the left lateral edge and distant from the upper edge, respectively, 1.5 cm, 5 cm, 7 cm and cm 9; two other points must be 1.5 cm away from the upper edge and 4.5 cm and 8.5 cm away from the left side edge respectively.
c. This identification, of course, could be done by operating on the cardboard-matrix with a common row, instead we will do it using the particular row that we have prepared: the multifunctional Ruler.
d. Operating on the top left corner of the cardboard-matrix, we superimpose the multifunctional ruler vertically on it, starting from its ALFA end.
e. Through the four holes on the multifunctional Ruler, we draw the first four rods on the cardboard-matrix.
f. Operating again on the top left corner of the cardboard-matrix, we superimpose the multifunctional ruler horizontally, starting from its BETA end.
g. Through the first and third of the four holes on the multifunctional Ruler, we draw two more rods on the cardboard-matrix.
h. We have obtained six rods in all.
i. The cardboard-matrix is folded twice, so as to obtain four quadrants and in such a way that the quadrant on which we have identified the six points for drilling are visible.
j. The drilling is carried out, involving in the drilling all the four layers which were formed in the cardboard-matrix by the effect of the folds, and thus we obtain the twenty-four holes that will be involved in the packaging of the mask.
k. The twenty-four holes are distributed six to six on the four quadrants that formed in the folds of the cardboard-matrix, and it appears that the holes of the first quadrant are symmetrical to the holes of the second quadrant, and that the holes of the first and second quadrant together, are symmetrical to the holes of the third and fourth quadrant together.
l. The points of the first quadrant are marked with the letters from A1 to F1, the points of the second quadrant are marked with the letters from A2 to F2, the points of the third quadrant are marked with the letters from A3 to F3, the points of the fourth quadrant are marked with the letters from A4 to F4.
m. The Matrix of the Structure Form and of the Screen Form is ready.
.
.
.
J. CREATION OF THE MATRIX FOR THE "PILLOW"
a. A 15 cm by 15 cm cardboard is prepared, which folds twice and is then reopened.
b. Operating on the top left corner of the cardboard-matrix, we have to identify two points, in correspondence of which we will then drill holes.
c. These two points must be 1 cm away from the upper edge and 1.5 cm and 5.5 cm away from the left lateral edge respectively.
d. This identification, of course, could be done by operating on the matrix cardboard with a common row, instead we will do it by operating with the particular line that we have prepared: the multifunctional Ruler.
e. Operating on the top left corner of the cardboard-matrix, we superimpose the multifunctional Ruler horizontally starting from its GAMMA end, matching with the left edge of the cardboard, not the end of the Ruler but the segment we have drawn at 3 cm away from that end.
f. Through the first and third of the four holes on the multifunctional Ruler, we draw two rods on the cardboard-matrix.
g. The cardboard-matrix is folded twice, so as to obtain four quadrants and in such a way that the quadrant on which we have identified the two points for drilling are visible.
h. The drilling is carried out, involving in the drilling all the four layers that were formed in the cardboard-matrix as a result of the folding, and thus we obtain the eight holes that will be involved in the packaging of the mask.
i. Once the cardboard-matrix is open, the holes of one of the two sections are marked, from left to right, with the letters B2, A2, A1 and B1, while the holes of the other section, lower than the first, are marked, always by left right, with the letters B3, A3, A4 and B4.
j. The holes thus marked correspond to the holes marked with the same letters on the Matrix of the Forms Structure and Screen.
k. The Matrix of the Pillow Form is ready.
.
.
.
K. CREATION OF THE FORMS OF WORK
1. Realization of the Form of work to square and drill the "Structure"
a. Take a 21 cm by 24 cm cardboard and insert it folded in half inside the Matrix Structure and Screen, also folded in half, thus forming two sections.
b. The twelve drilling points made on a section of the Matrix are shown on the Form with a rod.
c. Keeping the sheet folded, it is perforated in correspondence with the marked rods, involving in the drilling both the layers that formed in the cardboard due to the effect of folding, so as to obtain in one go all the twenty-four holes of which the Structure Form is composed.
d. The Form for the Structure is ready.
2. Creation of the Form of work to square and drill the "Screen"
a. Take a 21 cm by 24 cm cardboard and insert it folded in half inside the Matrix Structure and Screen, also folded in half.
b. The six drilling points made on a quadrant of the Matrix are shown on the Form with a rod.
c. The cardboard-form is folded again, so as to obtain four quadrants and in such a way that the quadrant on which we have identified the six points for drilling is visible.
d. The drilling is carried out, involving in the drilling all the four layers which were formed in the cardboard due to the effect of the folds, and thus we obtain the twenty-four holes of which the Screen Form is composed.
e. The Form for the Screen is ready.
3. Creation of the Form of work to square and drill the "Pillow"
a. Take a 15 cm by 15 cm cardboard and insert it folded in half inside the Pillow Matrix, also folded in half, thus forming two sections.
b. The drilling points made on a section of the Matrix are shown on the Form with a rod.
c. Keeping the sheet folded, it is perforated in correspondence with the marked rods, involving in the perforation both the layers that formed in the cardboard due to the effect of folding, and thus we obtain all at once the eight holes of which the Pillow Form is made.
d. The Form for the Pillow is ready.
.
.